
Omega Naked Price Indicator MT5
Omega Naked Price IndicatorOmega Naked Price MT5 ReviewsOmega Naked Price MT5 ReviewOmega Naked Price Indicator ReviewOmega Naked Price Indicator MT5 Review
Updated 30 Sept 2026

Omega Naked Price Indicator MT5

Omega Naked Price Indicator is an MT5 price action tool using Al Brooks & Bob Volman methods, combining market structure, EMA, swing analysis, key levels and PA setups.

Buy now — $25Add to cart
Download link right after paymentLifetime licenceInstall guide includedFree updates to new versions
Pay with Visa · MastercardUSDT · BTC · ETHBinance Pay
Not sure it fits your broker or account?Ask a question
Optimize Settings

Recommended settings for Omega Naked Price Indicator MT5

🔢 Omega Naked Price – Easy-to-Read Inputs Guide

Omega Naked Price is a MetaTrader 5 price action indicator that analyses market structure, swings, trading ranges, EMA behavior, price-action bar types, false breakouts, Quasimodo patterns, wedges, trend lines, and measured moves.
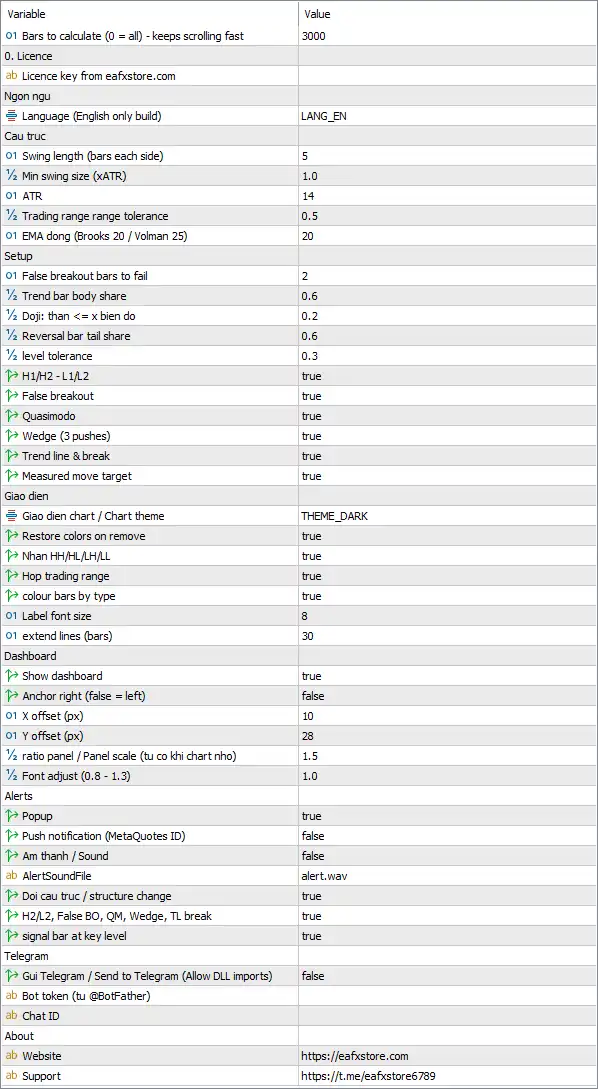
Omega Naked Price Indicator MT5 Settings Panel

🔢 Installation

⚙️ Installing the Indicator

🔹 Indicator File — Copy the received OmegaNakedPrice.ex5 file into MQL5 → Indicators through File → Open Data Folder in MetaTrader 5.

🔹 Refresh Navigator — Open the Navigator with Ctrl+N, right-click Indicators, and select Refresh, or restart MetaTrader 5.

🔹 Allow DLL Imports — Open Tools → Options → Expert Advisors and enable Allow DLL imports. This is required for licence verification, Telegram, and the WEB/TELEGRAM buttons.

🔹 Attach to Chart — Open the required chart and drag Omega Naked Price from the Navigator onto the chart.

🔹 Indicator DLL Permission — In the indicator's Common tab, make sure Allow DLL imports is enabled.

🔹 Licence Key — Enter the licence key into InpLicenseKey under the Inputs tab.

🔹 Licence Confirmation — After clicking OK, the Experts tab should display a message similar to Licence: Licence OK … and the dashboard should appear.

🔹 Change Settings — Press Ctrl+I, select Omega Naked Price, and click Properties. Settings can also be accessed by double-clicking objects drawn by the indicator.

🔹 Internet Connection — An internet connection is required for licence verification. After a successful check, short outages are supported through the licence server's grace period, typically around 72 hours.

⚙️ Understanding the Inputs

🔹 The Inputs tab contains the settings in a fixed order and groups them into General, Licence, Language, Structure, Setup, Appearance, Dashboard, Alerts, Telegram, and About sections.

🔹 MetaTrader 5 displays the description shown in the Variable column rather than the internal variable name. This guide includes both so each setting can be matched precisely.

🔹 Save / Load Presets — Use Save in the Inputs tab to store settings as a .set file and Load to apply a saved preset to another chart.

🔹 Chart Template — The complete chart can also be saved through Right-click chart → Templates → Save Template.

🔢 General & Licence

🔹 Bars to calculate (0 = all) - keeps scrolling fast [MaxBarsCalc] — Default: 3000 — Controls how many recent bars are analysed. Swings, structure, setups, arrows, and labels are calculated only inside this window. Recommended: 2000–5000.

🔹 Setting 0 analyses the entire available history. This can make MetaTrader 5 slower, especially on M1/M5 charts containing years of historical data.

🔹 Licence key from eafxstore.com [InpLicenseKey] — Default: (empty) — Enter the licence key received from eafxstore.com. Leading and trailing spaces are removed automatically and the key is not case-sensitive. Recommended: Enter the valid licence key.

🔹 If InpLicenseKey is empty, the indicator does not start and displays Please enter your licence key.

🔹 The licence is checked when the indicator loads and approximately every 30 minutes. Switching trading accounts triggers another automatic licence check.

🔢 Language & Structure

🔹 Language (English only build) [Lang] — Default: LANG_EN — Available values are LANG_VI and LANG_EN, but this build displays chart labels, dashboard text, alerts, and Telegram messages in English. Recommended: LANG_EN.

🔹 Swing length (bars each side) [PivLen] — Default: 5 — Defines how many bars on each side are required to confirm a swing high or swing low. Recommended: 3 for scalping to 7 for swing trading.

🔹 Lower values such as 2–3 produce more swings and faster but noisier structure.

🔹 Higher values such as 6–10 identify larger swings and produce cleaner but later structure labels.

🔹 A swing label appears only after the required bars on the right side have closed.

🔹 Min swing size (xATR) [SwingATR] — Default: 1.0 — Defines the minimum distance, measured in ATR, between a new swing and the previous opposite swing. Smaller pivots are ignored. Recommended: 0.8–1.5.

🔹 Lower values show more detailed market structure, while higher values filter smaller movements and keep more significant price legs.

🔹 ATR [AtrLen] — Default: 14 — Defines the Average True Range period using Wilder smoothing. ATR is the volatility reference used for minimum swing size, level tolerance, trading-range detection, false-breakout invalidation, trend-line break margins, and label offsets. Recommended: 14.

🔹 Trading range range tolerance [RangeTolATR] — Default: 0.5 — Determines when the market is classified as a trading range by comparing the latest swing highs and lows within the selected ATR tolerance. Recommended: 0.4–0.7.

🔹 Higher values make trading-range detection looser, while lower values require flatter highs and lows.

🔹 EMA dong (Brooks 20 / Volman 25) [EMALen] — Default: 20 — Defines the dynamic EMA displayed on the chart and used for EMA gap analysis, EMA signal bars, PA Score, and the dashboard EMA card. Recommended: 20 for Al Brooks style or 25 for Bob Volman style.

🔢 Setup

🔹 False breakout bars to fail [FBBars] — Default: 2 — Defines the maximum number of bars allowed for price to close back inside a broken swing level or range edge for the move to qualify as a false breakout. Recommended: 1–3.

🔹 1 detects only very fast rejections, 2 is the default, and 3 allows slower failures.

🔹 If the move takes longer than the selected number of bars or a candle closes more than 1 ATR beyond the level, the breakout is treated as real.

🔹 Trend bar body share [TrendBody] — Default: 0.6 — Defines the minimum candle-body percentage of the complete bar range required for trend-bar classification. Recommended: 0.55–0.7.

🔹 Doji: body ≤ x of the bar range [DojiBody] — Default: 0.2 — Classifies a candle as a doji when its body is equal to or smaller than the selected percentage of its total range. Recommended: 0.1–0.25.

🔹 Reversal bar tail share [TailShare] — Default: 0.6 — Defines the minimum tail percentage required for reversal-bar classification. Recommended: 0.5–0.66.

🔹 A bullish reversal bar requires a sufficiently large lower tail and a close in the upper third, while a bearish reversal bar requires a sufficiently large upper tail and a close in the lower third.

🔹 Lower values detect more reversal bars; higher values keep only clearer rejection patterns.

🔹 Level tolerance [LevelTolATR] — Default: 0.3 — Defines how close price must come to a key level, measured in ATR, to be considered at that level. Recommended: 0.2–0.4.

🔹 This setting is used for signal bars around the EMA, swings, range edges, Quasimodo levels, and trend lines.

🔹 H1/H2 - L1/L2 [ShowH1H2] — Default: true — Enables or disables two-legged pullback detection. H1/H2 are shown in bullish trends and L1/L2 in bearish trends. Only H2/L2 generate alerts when setup alerts are enabled.

🔹 False breakout [ShowFalseBO] — Default: true — Enables or disables detection of false breakouts from swing highs, swing lows, and trading-range edges.

🔹 Quasimodo [ShowQM] — Default: true — Enables or disables Quasimodo detection, dashed QM lines, QM formed events, QM level-hit events, and their alerts.

🔹 Wedge (3 pushes) [ShowWedge] — Default: true — Enables or disables three-push wedge top and bottom detection.

🔹 Trend line & break [ShowTL] — Default: true — Enables or disables the automatic trend line, channel line, trend-line break detection, and trend-line signal level.

🔹 Measured move target [ShowMM] — Default: true — Enables or disables the measured-move projection line and measured-move reached event.

🔢 Appearance

🔹 Giao dien chart / Chart theme [Theme] — Default: THEME_DARK — Applies a colour theme to the chart and switches the chart to candlesticks.

🔹 THEME_NONE keeps the existing chart colours and template.

🔹 THEME_DARK uses a dark grey-blue background with teal/red candles.

🔹 THEME_MIDNIGHT uses a deep navy background with brighter candles.

🔹 THEME_LIGHT uses a white background with a light grid.

🔹 Restore colors on remove [RestoreTheme] — Default: true — Restores the previous chart colours when the indicator is removed. Recommended: true.

🔹 Nhan HH/HL/LH/LL [ShowSwingLbl] — Default: true — Shows or hides HH, HL, LH, and LL swing labels. Structure calculations continue even when the labels are hidden.

🔹 Hop trading range [ShowRangeBox] — Default: true — Shows or hides the shaded trading-range box and its caption.

🔹 colour bars by type [ColorBars] — Default: true — Reserved for colouring candles according to bar type. In version 1.0 this setting has no visible effect. Recommended: Leave at true.

🔹 Label font size [LabelFont] — Default: 8 — Controls the font size of swing labels, range captions, MM and QM price tags, wedge labels, and trend-line break labels. Recommended: 7–10.

🔹 extend lines (bars) [ExtendBars] — Default: 30 — Defines how many bars into the future horizontal levels are extended. Quasimodo and measured-move lines use this value, while the trading-range box extends approximately half this distance. Recommended: 20–60.

🔢 Dashboard

🔹 Show dashboard [ShowDash] — Default: true — Shows or hides the dashboard. Arrows, levels, and alerts continue working when the dashboard is hidden.

🔹 Anchor right (false = left) [DashRight] — Default: false — Places the dashboard at the top-left when false or top-right when true.

🔹 X offset (px) [DashX] — Default: 10 — Controls the horizontal distance from the selected chart side.

🔹 Y offset (px) [DashY] — Default: 28 — Controls the vertical distance from the top of the chart.

🔹 Panel scale [DashScale] — Default: 1.5 — Controls the overall dashboard size. The indicator automatically reduces the panel size on small charts, with a minimum scale of 0.55. Recommended: 1.0–1.5.

🔹 Font adjust (0.8 - 1.3) [DashFontAdj] — Default: 1.0 — Adjusts dashboard text size without changing the panel size. Recommended: 0.8–1.3.

🔹 The dashboard can be moved by dragging its header. The manually saved position overrides DashX and DashY for that chart.

🔹 To return to the input position, open F3 → Global Variables and delete variables beginning with OMPRIC_DASH.

🔢 Alerts

🔹 Alerts are sent only for bars that close while the indicator is running. Historical signals are not sent as new alerts when the indicator loads.

🔹 Popup [AlertPopup] — Default: true — Displays the standard MetaTrader alert window with a sound.

🔹 Push notification (MetaQuotes ID) [AlertPush] — Default: false — Sends alerts to the MetaTrader 5 mobile application. A valid MetaQuotes ID must be configured. Recommended: true when mobile alerts are required.

🔹 Am thanh / Sound [AlertSoundOn] — Default: false — Plays the selected sound file when an alert occurs.

🔹 AlertSoundFile [AlertSoundFile] — Default: alert.wav — Defines the .wav sound file used by the indicator. The file must be located in the terminal's Sounds folder.

🔹 Doi cau truc / structure change [AlertStructure] — Default: true — Alerts when the market changes between bullish trend, bearish trend, trading range, or transition.

🔹 H2/L2, False BO, QM, Wedge, TL break [AlertSetups] — Default: true — Alerts for H2/L2 pullbacks, false breakouts, Quasimodo events, wedge tops/bottoms, and trend-line breaks. The corresponding setup must also be enabled in the Setup group.

🔹 signal bar at key level [AlertSignalBar] — Default: true — Alerts when a bullish or bearish signal bar forms around the EMA, swing, range edge, QM, or trend line. The alert includes the bar reading and closing price.

🔢 Telegram

🔹 Gui Telegram / Send to Telegram [TgEnable] — Default: false — Sends indicator alerts to Telegram. DLL imports must be enabled. When enabled, a TEST TG button appears in the dashboard footer.

🔹 Bot token (tu @BotFather) [TgToken] — Default: (empty) — Stores the token of the Telegram bot created through @BotFather.

🔹 Chat ID [TgChatID] — Default: (empty) — Defines the destination chat. It can be a personal chat ID, group ID, or channel ID. The bot must be a member of the group or channel.

Telegram Setup

🔹 Open Telegram and contact @BotFather.

🔹 Send /newbot and follow the instructions.

🔹 Copy the bot token into TgToken.

🔹 Open a chat with the new bot and press Start.

🔹 Obtain the required chat ID and enter it into TgChatID.

🔹 For a group, add the bot to the group. Group IDs usually begin with -100.

🔹 Enable Allow DLL imports in both Tools → Options → Expert Advisors and the indicator's Common tab.

🔹 Set TgEnable = true.

🔹 Click TEST TG in the dashboard footer.

🔹 If the test fails, check the bot token, Chat ID, Start status, DLL permissions, and access to api.telegram.org.

🔢 About

🔹 Website [AboutWeb] — Default: https://eafxstore.com — Defines the website opened by the dashboard's WEB button. Recommended: Keep the default value.

🔹 Support [AboutTelegram] — Default: https://t.me/eafxstore6789 — Defines the support channel opened by the TELEGRAM button. Recommended: Keep the default value.
Full review

Quick Verdict

Omega Naked Price Indicator is a MetaTrader 5 price action tool based on Al Brooks and Bob Volman methods. It combines market structure, EMA, swing analysis, key levels, price action setups, PA Score and alerts to keep charts clean while providing structured trading context.

Best For

✅ Price action traders using Al Brooks or Bob Volman trading concepts.

✅ Traders who prefer clean charts without multiple oscillators.

✅ Scalpers and intraday traders analyzing market structure and pullbacks.

✅ Users who want price action alerts across multiple charts and timeframes.

Overall Rating

8.8/10 ⭐⭐⭐⭐⭐


What is Omega Naked Price Indicator?

Omega Naked Price is a MetaTrader 5 price action indicator built around the trading methods of Al Brooks and Bob Volman. It analyzes market structure, dynamic support and resistance, individual candle behavior and classic price action setups directly on the chart. The indicator combines swing labels, EMA, Trend lines, channels, trading ranges, Quasimodo levels, measured moves and a dashboard while keeping the chart relatively clean.

⭐ Join Our Channel Telegram


How Does Omega Naked Price Indicator Work?

Market Structure Analysis

Omega Naked Price Indicator starts by calculating an EMA and ATR, then identifies confirmed swing highs and lows. Each swing is classified as a higher high, higher low, lower high or lower low, allowing the indicator to determine whether the market is in a bull trend, bear trend, transition or trading range.

Dynamic Price Levels

The indicator automatically updates trend lines, channels, measured move targets and Quasimodo levels. These structures provide reference points for analyzing potential continuation, reversal and breakout situations.

Price Action Setup Detection

After identifying the market context, the indicator searches for H1 H2 and L1 L2 pullbacks, false breakouts, wedges, trend line breaks, Quasimodo setups and signal bars at important levels.

Bar by Bar Reading

Each closed candle is classified according to its body, tails and relationship with previous price action. The indicator identifies trend bars, reversal bars, inside bars, outside bars, doji candles and smaller pressure bars, then presents the interpretation through the dashboard.

PA Score

The PA Score converts several elements of the price action analysis into a 0 to 100 reading. Market structure, EMA position, recent setups, Quasimodo levels, wedges and live bar pressure contribute to the score. A reading of 60 or higher is bullish, while 40 or lower is bearish.

The PA Score is designed as a context filter rather than an independent trading signal.

Closed Bar Signal Logic

Setups, arrows and alerts are calculated on closed candles. The forming candle can be displayed as a live bar but does not create a new arrow or alert until it closes.

This closed-bar approach helps keep historical signals stable instead of allowing them to change with every incoming tick.


Key Features of Omega Naked Price Indicator

Market Structure and Swing Labels

The indicator marks confirmed swings with HH, HL, LH and LL labels and uses these points to classify the current market state. ATR filtering helps reduce insignificant price movements from being treated as major structure.

Trading Range Detection

When swing highs and lows remain within the configured ATR tolerance, the indicator identifies a trading range and displays a shaded range box. False breakouts are then evaluated around the range boundaries.

Dynamic EMA

The EMA acts as dynamic support and resistance while EMA gap bars measure how consistently price remains above or below the moving average. The default EMA is 20, while 25 can be used for a Bob Volman style configuration.

H1 H2 L1 L2 Pullback Setups

The indicator tracks two-legged pullbacks within trends. H1 and H2 identify bullish pullback entries, while L1 and L2 provide the corresponding bearish structure. H2 and L2 receive particular emphasis within the setup logic.

False Breakout Detection

The false breakout engine identifies situations where price moves beyond a swing or range boundary before closing back inside the structure. The setup is filtered against strong trends to avoid automatically fading breakouts in the wrong market context.

Quasimodo Levels

Omega Naked Price identifies bullish and bearish Quasimodo structures and marks the relevant levels directly on the chart. Invalidation points are also defined within the setup logic.

Wedge and Trend Line Analysis

The indicator detects three-push wedge structures and trend line breaks. A trend line break is treated as an early sign of potential trend weakness, with the product logic recommending a test of the extreme before considering a reversal.

Price Action Signal Bars

A gold signal dot appears when a reversal bar or strong reversal trend bar forms around a key level such as the EMA, swing level, range boundary, Quasimodo level or trend line.

Dashboard and Alerts

The dashboard displays market structure, PA Score, EMA distance, pullback count, live bar information, the last closed bar reading, key levels and recent events. Alerts are available through popup, mobile push, sound and Telegram.


Omega Naked Price Indicator Review

Omega Naked Price Indicator takes a structured price action approach rather than filling the chart with multiple technical oscillators. Its main purpose is to organize the information that discretionary price action traders normally read manually.

The combination of market structure and individual bar analysis is one of the strongest aspects of the indicator. Traders can see whether price is trending, transitioning or ranging while also reviewing what the latest closed candle is communicating.

Omega Naked Price MT5 Reviews
Omega Naked Price MT5 Review

Omega Naked Price MT5 Review

Simple BUY and SELL Entry Strategy

For beginners, the Omega Naked Price Indicator can be used with a simple price action approach. The main idea is to identify important support and resistance levels, observe how price reacts to them, and wait for a clear price action confirmation before entering a trade.

BUY Entry

🔹 Step 1: Identify a clear support level or demand area where price has previously reacted upward.

🔹 Step 2: Wait for price to return to the support area and observe the behavior of the candles around the level.

🔹 Step 3: Look for a bullish price action confirmation, such as a strong bullish candle, rejection of the support level, or a bullish breakout of a nearby short-term high.

🔹 Step 4: Enter a BUY position after the bullish confirmation candle closes.

🔹 Stop Loss: Place the Stop Loss below the support level or below the recent swing low.

🔹 Take Profit: Target the next resistance level or use a predefined risk-to-reward ratio such as 1:2.

SELL Entry

🔹 Step 1: Identify a clear resistance level or supply area where price has previously reacted downward.

🔹 Step 2: Wait for price to return to the resistance area and observe the behavior of the candles around the level.

🔹 Step 3: Look for a bearish price action confirmation, such as a strong bearish candle, rejection of the resistance level, or a bearish breakout of a nearby short-term low.

🔹 Step 4: Enter a SELL position after the bearish confirmation candle closes.

🔹 Stop Loss: Place the Stop Loss above the resistance level or above the recent swing high.

🔹 Take Profit: Target the next support level or use a predefined risk-to-reward ratio such as 1:2.

Simple Entry Rule for Beginners

The basic rule is:

BUY = Support + Bullish Price Action + Confirmation

SELL = Resistance + Bearish Price Action + Confirmation

Avoid entering simply because price reaches a support or resistance level. Wait for a clear rejection or breakout confirmation before opening a trade. This helps distinguish a potential reversal from a level that price may simply break through.

This simple approach makes the Omega Naked Price Indicator easier for beginners to understand and apply while keeping the focus on raw price behavior, market structure, support, and resistance. More advanced traders can later combine price action with breakouts, trend structure, candlestick patterns, and other market context.

Omega Naked Price Indicator MT5 Review

Omega Naked Price Indicator MT5 Review

Why Omega Naked Price Indicator Stands Out

Built Around Proven Price Action Concepts

The indicator combines concepts associated with Al Brooks and Bob Volman, including bar-by-bar analysis, H1 H2 L1 L2 pullbacks, false breakouts, EMA behavior, wedges and measured moves.

Clean Naked Chart Approach

Instead of depending on a large collection of oscillators, Omega Naked Price focuses on price structure, candle behavior, dynamic levels and price action setups.

Objective Market Structure

Swing detection and ATR filtering provide consistent rules for identifying HH, HL, LH and LL structures and determining the current market state.

Context Before Entry

Each setup can be viewed alongside the current trend state, EMA position, nearby key levels and PA Score. This creates more context than a standalone buy or sell arrow.

Multiple Price Action Setups

H1 H2 L1 L2, false breakouts, Quasimodo formations, wedges, trend line breaks and signal bars provide several different ways to interpret market behavior.

Built In Trade Planning References

Alerts can include entry references and stop references associated with signal bars, Quasimodo levels and breakout extremes. Measured move targets provide an additional framework for profit planning.

Multi Market Compatibility

ATR based tolerances allow the indicator to adapt its calculations across different symbols and timeframes rather than relying entirely on fixed price distances.

Stable Closed Bar Signals

The indicator calculates setups and alerts on completed candles, reducing intrabar signal changes and keeping historical arrows more consistent.


Risk Management Features

Structure Based Trade Filtering

The indicator provides market context before a setup is considered. H2 buys are favored within bullish structure and L2 sells within bearish structure, while range conditions are handled differently.

Signal Bar Confirmation

Quasimodo levels, wedges and trend line breaks are treated as areas rather than automatic entries. The recommended approach waits for a signal bar to confirm at the relevant level.

PA Score Filter

The PA Score can be used as an additional directional filter. The supplied recommendations suggest considering buy setups when the score is above 50 and sell setups when it is below 50.

Entry and Stop References

Setup alerts can provide entry references based on signal bar highs or lows and stop references around breakout extremes or Quasimodo invalidation levels.

Higher Timeframe Confirmation

The product recommendations suggest loading the indicator on a higher timeframe and aligning lower timeframe setups with the broader higher timeframe market structure.

Demo Testing

The recommended settings should be tested on the relevant symbol and timeframe using a demo account before live trading.


Omega Naked Price Indicator supports any timeframe from M1 to MN and can be applied to Forex, gold, indices, crypto, stocks and commodities.

Trading Style Timeframe Recommended Focus
Scalping M1 to M5 Bob Volman style EMA, pullbacks and false breakouts
Intraday M5 to M30 Al Brooks structure, H1 H2 L1 L2 and price action
Swing Trading H1 to D1 Market structure, key levels and trend continuation
Higher Timeframe Analysis H4 to MN Major structure, ranges and measured moves

For scalping, the recommended PivLen is 3, SwingATR 0.8, EMA 25 and RangeTolATR 0.4. These settings are aligned with the Volman style configuration.

For intraday trading, the default configuration uses PivLen 5, SwingATR 1.0, EMA 20 and RangeTolATR 0.5.

For swing trading, PivLen can be increased to 5 to 7, SwingATR to 1.2 to 1.5 and RangeTolATR to 0.6, with EMA 20 maintained as the suggested setting.


Weaknesses and Risk Warnings

Swing Confirmation Takes Time

Swing points require confirmation from bars on both sides. As a result, swing labels naturally appear with a delay and the latest swing can still move to a new extreme until the next opposite swing forms.

Not Every Setup Is a Trade Signal

The PA Score is a context summary rather than a standalone signal. Likewise, Quasimodo levels, wedges and trend line breaks represent areas that require confirmation rather than automatic entries.

Range Conditions Require Different Logic

The indicator distinguishes trading ranges from trends, and false breakouts are evaluated differently around range boundaries. Traders relying exclusively on trend continuation setups may therefore need to adapt their approach when the market becomes range-bound.

Higher Chart History Can Affect Performance

Using all available historical bars on M1 can increase processing requirements. The product recommends keeping MaxBarsCalc at a reasonable level, with approximately 2000 to 5000 bars suggested for analysis depending on timeframe.

Trading Risk Remains

Omega Naked Price Indicator is an analysis tool and does not guarantee profits. Trading Forex, CFDs and other leveraged products carries significant risk, while past performance does not guarantee future results.


Who Should Use Omega Naked Price Indicator?

Price Action Traders

Traders following Al Brooks or Bob Volman concepts can use the indicator to organize market structure, bar behavior, pullbacks and classic price action setups in one MT5 chart.

Beginner Price Action Traders

The bar-by-bar explanations and dashboard can provide structured context for traders learning how candle behavior relates to market structure.

Scalpers and Intraday Traders

The M1 to M30 settings support short-term trading styles where EMA behavior, pullbacks, false breakouts and signal bars are important.

Experienced Traders

Experienced price action traders can use the indicator as an additional charting and alert layer rather than manually monitoring every setup.

Multi Chart Traders

Popup, push, sound and Telegram alerts make the product suitable for traders monitoring multiple symbols and timeframes simultaneously.


Product Download Package?

The download package of the product suite includes:

✅ Indicator: OmegaNakedPrice_v1.0.ex5

✅ Omega_Naked_Price_Inputs_Guide.pdf

➡️ Reviewed by David Easton


Final Verdict

Omega Naked Price Indicator combines Al Brooks and Bob Volman price action concepts with automated market structure analysis inside MetaTrader 5. It identifies trends, ranges, swings, H1 H2 L1 L2 setups, false breakouts, Quasimodo levels, wedges, trend line breaks and signal bars while keeping the chart focused on price. The dashboard, PA Score and alerts add practical decision support without turning the indicator into an automatic trading system.

Questions about Omega Naked Price Indicator MT5

❓ What does Omega Naked Price Indicator do?

Omega Naked Price Indicator is a MetaTrader 5 price action tool based on Al Brooks and Bob Volman methods, analyzing market structure, key levels, bar behavior, and price action setups.

❓ Which price action setups does Omega Naked Price Indicator detect?

Omega Naked Price Indicator detects H1/H2 and L1/L2 pullbacks, false breakouts, Quasimodo patterns, wedges, trend line breaks, and signal bars at key levels.

❓ How does Omega Naked Price Indicator determine the market structure?

Omega Naked Price Indicator analyzes confirmed swing highs and lows, labels them HH, HL, LH, or LL, and classifies the market as a bull trend, bear trend, transition, or trading range.

❓ Does Omega Naked Price Indicator repaint its trading signals?

No. Omega Naked Price Indicator calculates setups, arrows, and alerts only after candles close, so confirmed signals do not flicker with intrabar price movements.

❓ What is the PA Score in Omega Naked Price Indicator?

Omega Naked Price Indicator uses a 0–100 PA Score to summarize market structure, price position relative to the EMA, recent setups, Quasimodo levels, wedges, and live bar pressure.

❓ Does Omega Naked Price Indicator provide bar-by-bar price action analysis?

Yes. Omega Naked Price Indicator classifies closed bars such as trend bars, reversal bars, inside bars, outside bars, dojis, and small bars, with plain-English explanations on the dashboard.

❓ How does Omega Naked Price Indicator identify H1/H2 and L1/L2 setups?

Omega Naked Price Indicator counts two-legged pullbacks within the current trend. H1/H2 setups identify bullish pullbacks, while L1/L2 setups identify bearish pullbacks.

❓ Does Omega Naked Price Indicator provide key levels and trade planning information?

Yes. Omega Naked Price Indicator displays EMA, swing levels, trading ranges, trend lines, Quasimodo levels, measured-move targets, and entry or stop references for detected setups.

❓ What alerts are available in Omega Naked Price Indicator?

Omega Naked Price Indicator supports popup, mobile push, sound, and Telegram alerts for structure changes, H2/L2 setups, false breakouts, Quasimodo events, wedges, trend line breaks, and signal bars.

❓ Which markets and timeframes support Omega Naked Price Indicator?

Omega Naked Price Indicator supports Forex, gold, indices, crypto, stocks, and commodities across timeframes from M1 to MN.

Other products traders compare

From $25
Instant download
Choose option