


Every order block eventually faces a test. Some hold and launch strong moves. Others fail, and price slices straight through them. In the ICT (Inner Circle Trader) methodology, a failed order block does not simply become useless. When it fails in the right way, it turns into a breaker block: a zone that often flips from support to resistance, or from resistance to support, and offers precise entries in the new direction.
This guide explains what a breaker block is, how bullish and bearish breakers form, how they differ from order blocks and mitigation blocks, and how to build a trading setup around them.
A Quick Reminder: What is an Order Block?
An order block is the last opposing candle, or group of candles, before a strong move.
- A bullish order block is the last down-close candle before a strong rally.
- A bearish order block is the last up-close candle before a sharp decline.
Traders expect price to return to these zones, where large participants may have left unfilled orders. A breaker block forms when one of these zones fails after a key sequence of events.
What is a Breaker Block?
A breaker block is an order block that has been broken through after a liquidity sweep and a Market Structure Shift (MSS). Once broken, the zone is expected to act in the opposite role when price returns to it.
The logic is similar to classic support turning into resistance. Traders who entered at the original order block are now trapped and losing. When price comes back to their entry area, many of them exit at break-even, adding orders in the new direction and helping price react from the zone.
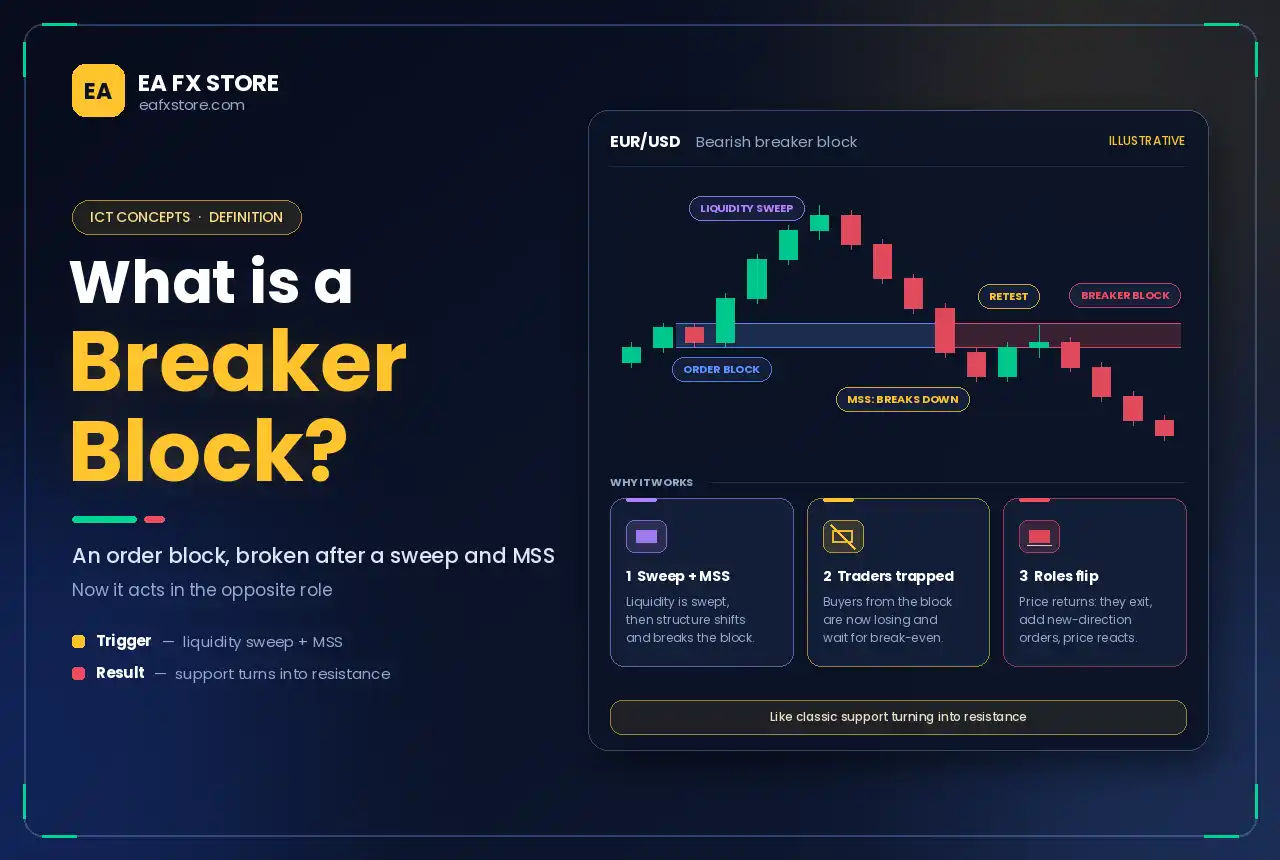
How a Bullish Breaker Forms
A bullish breaker signals a potential move higher. It forms in four steps:
- Swing low: price makes a low (call it Low 1).
- Swing high: price rallies to a high. The last up-close candle before price turns down from this high is a bearish order block.
- Lower low: price drops below Low 1, sweeping the sell-side liquidity resting beneath it.
- Break of the high: price rallies strongly and breaks above the swing high, creating a bullish MSS.
The bearish order block from step 2 has now failed. It becomes a bullish breaker. When price retraces into it, traders look for buying opportunities, expecting the old resistance to act as support.
How a Bearish Breaker Forms
A bearish breaker is the mirror image and signals a potential move lower:
- Swing high: price makes a high (High 1).
- Swing low: price drops to a low. The last down-close candle before price turns up from this low is a bullish order block.
- Higher high: price rallies above High 1, sweeping the buy-side liquidity resting above it.
- Break of the low: price falls sharply below the swing low, creating a bearish MSS.
The bullish order block from step 2 has failed and becomes a bearish breaker. When price rallies back into it, traders look for selling opportunities.
Breaker Block vs Order Block vs Mitigation Block
| Feature | Order block | Breaker block | Mitigation block |
| What it is | Last opposing candle before a strong move | Failed order block that flips role | Failed order block that flips role |
| Liquidity sweep before the break | Not required | Yes, a higher high or lower low | No, the swing fails to make a new extreme |
| Typical use | Continuation entries | Reversal entries after a sweep | Reversal entries after a failure swing |
| Relative strength | Depends on context | Often considered stronger | Often considered weaker |
The key difference between a breaker and a mitigation block is the liquidity sweep. A breaker forms after price takes out a prior high or low; a mitigation block forms when price fails to reach a new extreme before reversing.
How to Trade a Breaker Block
Here is a step-by-step plan for a bullish breaker. Reverse each step for a bearish breaker.
- Set your bias on a higher timeframe. Look for price at a higher-timeframe support level or in a bullish context.
- Identify the sweep. Watch for price to make a lower low that takes out an obvious swing low, ideally during a London or New York Kill Zone.
- Confirm the shift. Wait for a strong rally that closes above the most recent swing high. Displacement and a fair value gap make the signal stronger.
- Mark the breaker. Highlight the last up-close candle (or group of candles) before the drop that created the lower low. Some traders use the full candle range; others use only the candle body.
- Wait for the retracement. Let price return to the breaker zone. Do not chase the initial rally.
- Look for a reaction. A rejection candle, a lower-timeframe MSS or a small sweep inside the zone can confirm the entry. Reading OHLC structure helps you judge the strength of the reaction.
- Enter long inside the breaker zone.
- Place the stop below the breaker zone or below the sweep low for extra safety.
- Target buy-side liquidity, such as the previous day’s high, equal highs or the next major swing high.
Adding Confluence
A breaker block becomes more reliable when it lines up with other evidence:
- Volume Profile: a bullish breaker that overlaps the Value Area Low or a High Volume Node combines structure with a value level. A breaker near the Point of Control can attract strong reactions.
- Fair value gaps: an FVG overlapping the breaker zone creates a tighter, higher-quality entry area.
- Premium and discount: ICT traders prefer bullish breakers in the discount half of the range and bearish breakers in the premium half.
- VWAP: a breaker that aligns with session VWAP adds another layer of fair-value confluence.
- Harmonic patterns: a breaker inside a Potential Reversal Zone strengthens a reversal case.
Common Mistakes
- Skipping the sweep. Without a liquidity sweep, the pattern is not a breaker. It may be a mitigation block or simply a broken level.
- Marking the wrong candle. For a bullish breaker, use the last up-close candle before the move that made the lower low, not the candle at the low itself.
- Ignoring the higher timeframe. A breaker against a strong higher-timeframe trend has a lower chance of success.
- Entering without confirmation when the market is moving fast or around major news.
- Stops too tight. Breaker zones can be wide on higher timeframes, so adjust position size to fit a proper stop.
Frequently Asked Questions
What is a breaker block in ICT?
It is a failed order block that has been broken after a liquidity sweep and a Market Structure Shift, and is expected to act in the opposite role when price returns.
What is the difference between a breaker and an order block?
An order block is the last opposing candle before a strong move; a breaker is an order block that failed after a sweep and now acts as support or resistance in the new direction.
What is the difference between a breaker and a mitigation block?
A breaker forms after price sweeps a prior high or low; a mitigation block forms when price fails to make a new high or low before reversing.
Which timeframe is best for breaker blocks?
Breakers appear on all timeframes. Many traders identify them on 15-minute to one-hour charts and confirm entries on lower timeframes.
Conclusion
Breaker blocks turn failed order blocks into opportunities. By recognising the sequence of a liquidity sweep, a Market Structure Shift and a return to the failed zone, you can trade reversals with a clear structure and a defined invalidation point. Combine breakers with Kill Zones, fair value gaps and Volume Profile levels, and always manage your risk.
Risk warning: Trading Forex and CFDs on margin carries a high level of risk and may not be suitable for all investors. This article is for educational purposes only and is not investment advice.