


🔢 SharkHunter Fusion EA MT5: Complete Settings Guide and Risk Management Configuration
SharkHunter Fusion EA is an automated trading system for MetaTrader 5 designed around multi-timeframe trend analysis, momentum confirmation, and structured trade management. Its configuration combines Exponential Moving Averages (EMAs), the Relative Strength Index (RSI), and the Average True Range (ATR) with swing-based stop-loss placement, risk-to-reward targeting, breakeven protection, and trailing stops.
Additional controls include dynamic equity-based position sizing, daily drawdown limits, spread filtering, maximum concurrent trades, and candle-timeout liquidation. These settings allow traders to configure entry filters, manage exposure, and define how positions are protected and closed.
The following guide explains every input parameter and preserves its exact configured value.
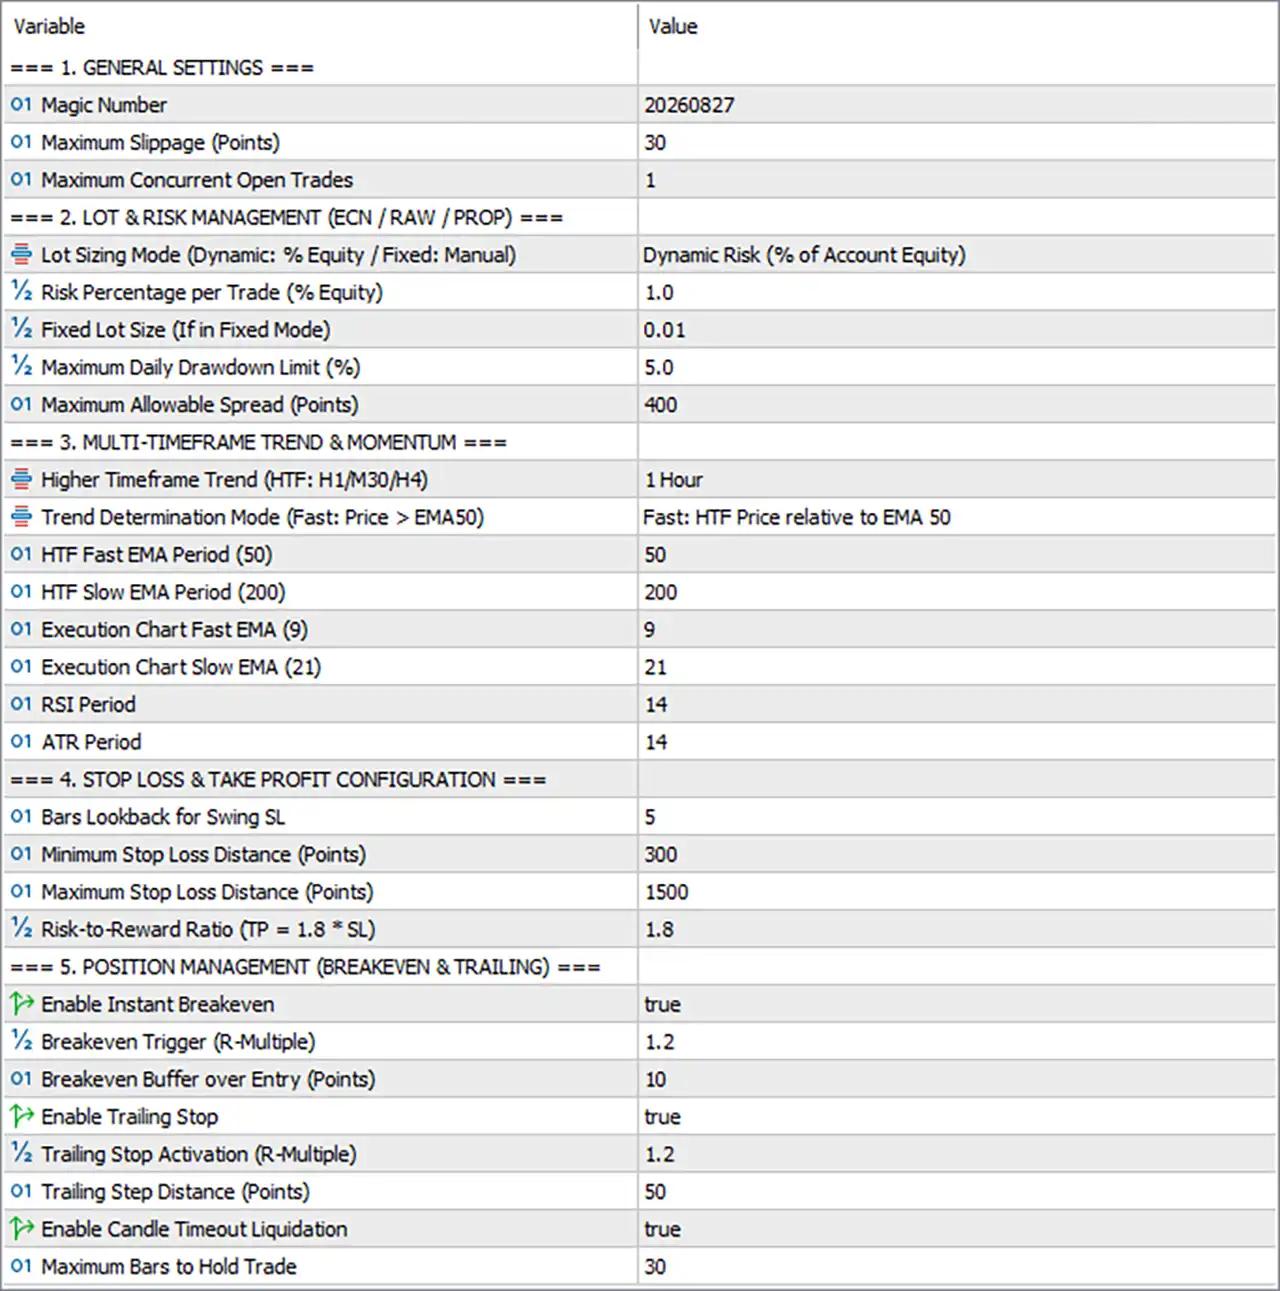
⚙️ General Settings
🔹 Magic Number = 20260827 — Assigns the identifier 20260827 to trades managed by SharkHunter Fusion EA MT5. This helps distinguish the EA’s positions from those opened by other Expert Advisors or manually, provided the relevant trading software uses Magic Numbers correctly.
🔹 Maximum Slippage (Points) = 30 — Sets the maximum permitted execution slippage to 30 points, subject to the EA’s order-execution implementation. This setting helps control the difference between the requested and executed price, although it cannot guarantee execution at the requested price during volatile conditions.
🔹 Maximum Concurrent Open Trades = 1 — Limits the configured number of simultaneously open trades to 1. This setting can reduce overlapping exposure and keep trade management more straightforward, although the precise scope of the limit depends on how the EA counts positions and orders.
⚙️ Lot and Risk Management (ECN / RAW / PROP)
🔹 Lot Sizing Mode (Dynamic: % Equity / Fixed: Manual) = Dynamic Risk (% of Account Equity) — Selects dynamic position sizing based on account equity rather than using a fixed manual lot size. The actual volume depends on the EA’s internal risk calculation, stop-loss distance, and broker contract specifications.
🔹 Risk Percentage per Trade (% Equity) = 1.0 — Sets the configured risk percentage per trade to 1.0, generally corresponding to 1% of account equity if the EA interprets the value as a percentage. Actual loss exposure depends on position sizing, stop-loss execution, slippage, and the EA’s implementation.
🔹 Fixed Lot Size (If in Fixed Mode) = 0.01 — Specifies a fixed trading volume of 0.01 lots when fixed lot sizing is selected. Since dynamic risk mode is currently active, this value may remain unused until the lot-sizing mode is changed.
🔹 Maximum Daily Drawdown Limit (%) = 5.0 — Sets the configured daily drawdown threshold to 5.0%. If the EA implements this limit as a trading guard, reaching the threshold may trigger restrictions on further trading. The exact reference point, reset time, and response to the limit depend on the EA’s internal logic.
🔹 Maximum Allowable Spread (Points) = 400 — Sets the maximum permitted spread to 400 points for the EA’s spread filter. Trades may be blocked when the spread exceeds this threshold, if the filter is implemented as expected. The practical spread represented by 400 points depends on the symbol’s tick size and broker quote format.
⚙️ Multi-Timeframe Trend and Momentum
🔹 Higher Timeframe Trend (HTF: H1/M30/H4) = 1 Hour — Selects the one-hour chart (H1) as the higher timeframe for trend analysis. Using a higher timeframe can help the EA assess the broader market direction before evaluating entries on the execution chart.
🔹 Trend Determination Mode (Fast: Price > EMA50) = Fast: HTF Price relative to EMA 50 — Selects the fast trend-determination method based on the higher-timeframe price relative to the 50-period EMA. The selected mode generally interprets price above EMA 50 as bullish and price below EMA 50 as bearish, subject to the EA’s precise signal rules.
🔹 HTF Fast EMA Period (50) = 50 — Sets the fast EMA period on the higher timeframe to 50 bars. This moving average provides a reference for identifying the broader trend and filtering potential trade directions.
🔹 HTF Slow EMA Period (200) = 200 — Sets the slow EMA period on the higher timeframe to 200 bars. EMA 200 can provide a longer-term trend reference, although its role in the active strategy depends on the selected trend-determination mode.
🔹 Execution Chart Fast EMA (9) = 9 — Sets the fast EMA on the execution chart to 9 bars. A shorter moving average responds relatively quickly to recent price changes and can support entry timing or short-term momentum analysis.
🔹 Execution Chart Slow EMA (21) = 21 — Sets the slow EMA on the execution chart to 21 bars. Comparing EMA 9 with EMA 21 can help identify short-term directional changes or momentum alignment, depending on the EA’s entry conditions.
🔹 RSI Period = 14 — Sets the Relative Strength Index calculation period to 14 bars. RSI measures the speed and magnitude of recent price movements and may be used to assess momentum or filter potential entries according to the EA’s programmed rules.
🔹 ATR Period = 14 — Sets the Average True Range calculation period to 14 bars. ATR measures market volatility and may help the EA evaluate price movement or contextualize stop-loss distances; the exact application depends on the strategy implementation.
⚙️ Stop-Loss and Take-Profit Configuration
🔹 Bars Lookback for Swing SL = 5 — Sets the swing stop-loss lookback to 5 bars. The EA can use recent price structure within this lookback to identify a potential swing high or swing low for stop-loss placement, depending on trade direction and its implementation.
🔹 Minimum Stop Loss Distance (Points) = 300 — Sets the minimum permitted stop-loss distance to 300 points. If the swing-based stop is closer than this threshold, the EA may widen the distance or adjust the stop placement according to its programmed rules.
🔹 Maximum Stop Loss Distance (Points) = 1500 — Sets the maximum permitted stop-loss distance to 1500 points. This can prevent trades from using stops that are too wide for the configured strategy, although the EA’s response when a calculated stop exceeds the limit must be verified.
🔹 Risk-to-Reward Ratio (TP = 1.8 × SL) = 1.8 — Sets the target reward-to-risk ratio to 1.8:1. Under the stated formula, the take-profit distance is calculated as 1.8 times the stop-loss distance. For example, a 500-point stop-loss would correspond to a 900-point take-profit if the EA applies the ratio directly to price distances.
⚙️ Position Management: Breakeven and Trailing
🔹 Enable Instant Breakeven = true — Enables the breakeven management feature. When its activation conditions are satisfied, the EA can move the stop-loss toward the entry price to reduce the risk of a profitable trade turning into a full initial loss.
🔹 Breakeven Trigger (R-Multiple) = 1.2 — Sets the breakeven activation threshold to 1.2R, where R typically represents the initial risk defined by the stop-loss distance. If implemented using this convention, the feature activates after price reaches a profit equivalent to 1.2 times the initial risk.
🔹 Breakeven Buffer over Entry (Points) = 10 — Sets the breakeven stop buffer to 10 points beyond the entry price. For a buy position, this may place the stop above entry; for a sell position, it may place the stop below entry. The buffer is intended to provide a small margin beyond the entry price, but commissions and swap costs can still affect the final net result.
🔹 Enable Trailing Stop = true — Enables trailing-stop management. When its activation conditions are met, the EA can adjust the stop-loss as the trade moves favorably, helping protect accumulated profits while allowing the position to remain open for further movement.
🔹 Trailing Stop Activation (R-Multiple) = 1.2 — Sets the trailing-stop activation threshold to 1.2R. If the EA defines R as the initial stop-loss risk, trailing management begins after the trade reaches a profit equivalent to 1.2 times that risk.
🔹 Trailing Step Distance (Points) = 50 — Sets the trailing-stop adjustment step to 50 points. Depending on the EA’s implementation, the stop-loss may be updated in increments or only after price has moved sufficiently far to satisfy this step.
🔹 Enable Candle Timeout Liquidation = true — Enables the candle-timeout liquidation feature. This setting allows the EA to close a trade when its holding period reaches the configured maximum number of bars, if that is how the timeout logic is implemented. It can help limit prolonged trade duration when the expected move does not develop.
🔹 Maximum Bars to Hold Trade = 30 — Sets the maximum holding duration to 30 bars for the candle-timeout feature. The elapsed time depends on the chart timeframe used by the EA. For example, 30 bars on an M15 chart represent 7.5 hours, while 30 bars on an H1 chart represent 30 hours.
🔢 Conclusion
SharkHunter Fusion EA MT5 is configured with a maximum of 1 concurrent open trade, a Magic Number of 20260827, dynamic equity-based risk sizing, a risk percentage of 1.0, a daily drawdown limit of 5.0%, and a maximum spread of 400 points.
Its trend and momentum configuration uses an H1 higher timeframe, EMA periods of 50 and 200 for higher-timeframe analysis, execution-chart EMAs of 9 and 21, RSI 14, and ATR 14. Stop-loss placement uses a 5-bar swing lookback with minimum and maximum distances of 300 and 1500 points. The configured risk-to-reward ratio is 1.8:1.
Breakeven, trailing-stop management, and candle-timeout liquidation are all enabled. Their main thresholds are 1.2R for both breakeven and trailing activation, a 10-point breakeven buffer, a 50-point trailing step, and a maximum holding duration of 30 bars.
Before live deployment, confirm how the EA calculates equity risk, enforces the daily drawdown threshold, applies the spread and slippage filters, and interprets the candle-timeout setting. Test the configuration on a demo account using the intended broker, symbol, and timeframe. A configured risk limit or protective stop cannot eliminate losses caused by gaps, slippage, or unusual market conditions.


