Omega ICT Killzone Indicator MT5
Omega ICT Killzone IndicatorOmega ICT Killzone Indicator ReviewsOmega ICT Killzone Indicator ReviewOmega ICT Killzone Indicator MT5 ReviewsOmega ICT Killzone Indicator MT5 Review
Updated 29 Sept 2026

Omega ICT Killzone Indicator MT5

Omega ICT Killzone is an advanced indicator for the MT5 platform, designed to automate key elements of the ICT methodology directly on the trading chart.

Buy now — $25Add to cart
Download link right after paymentLifetime licenceInstall guide includedFree updates to new versions
Pay with Visa · MastercardUSDT · BTC · ETHBinance Pay
Not sure it fits your broker or account?Ask a question
Optimize Settings

Recommended settings for Omega ICT Killzone Indicator MT5

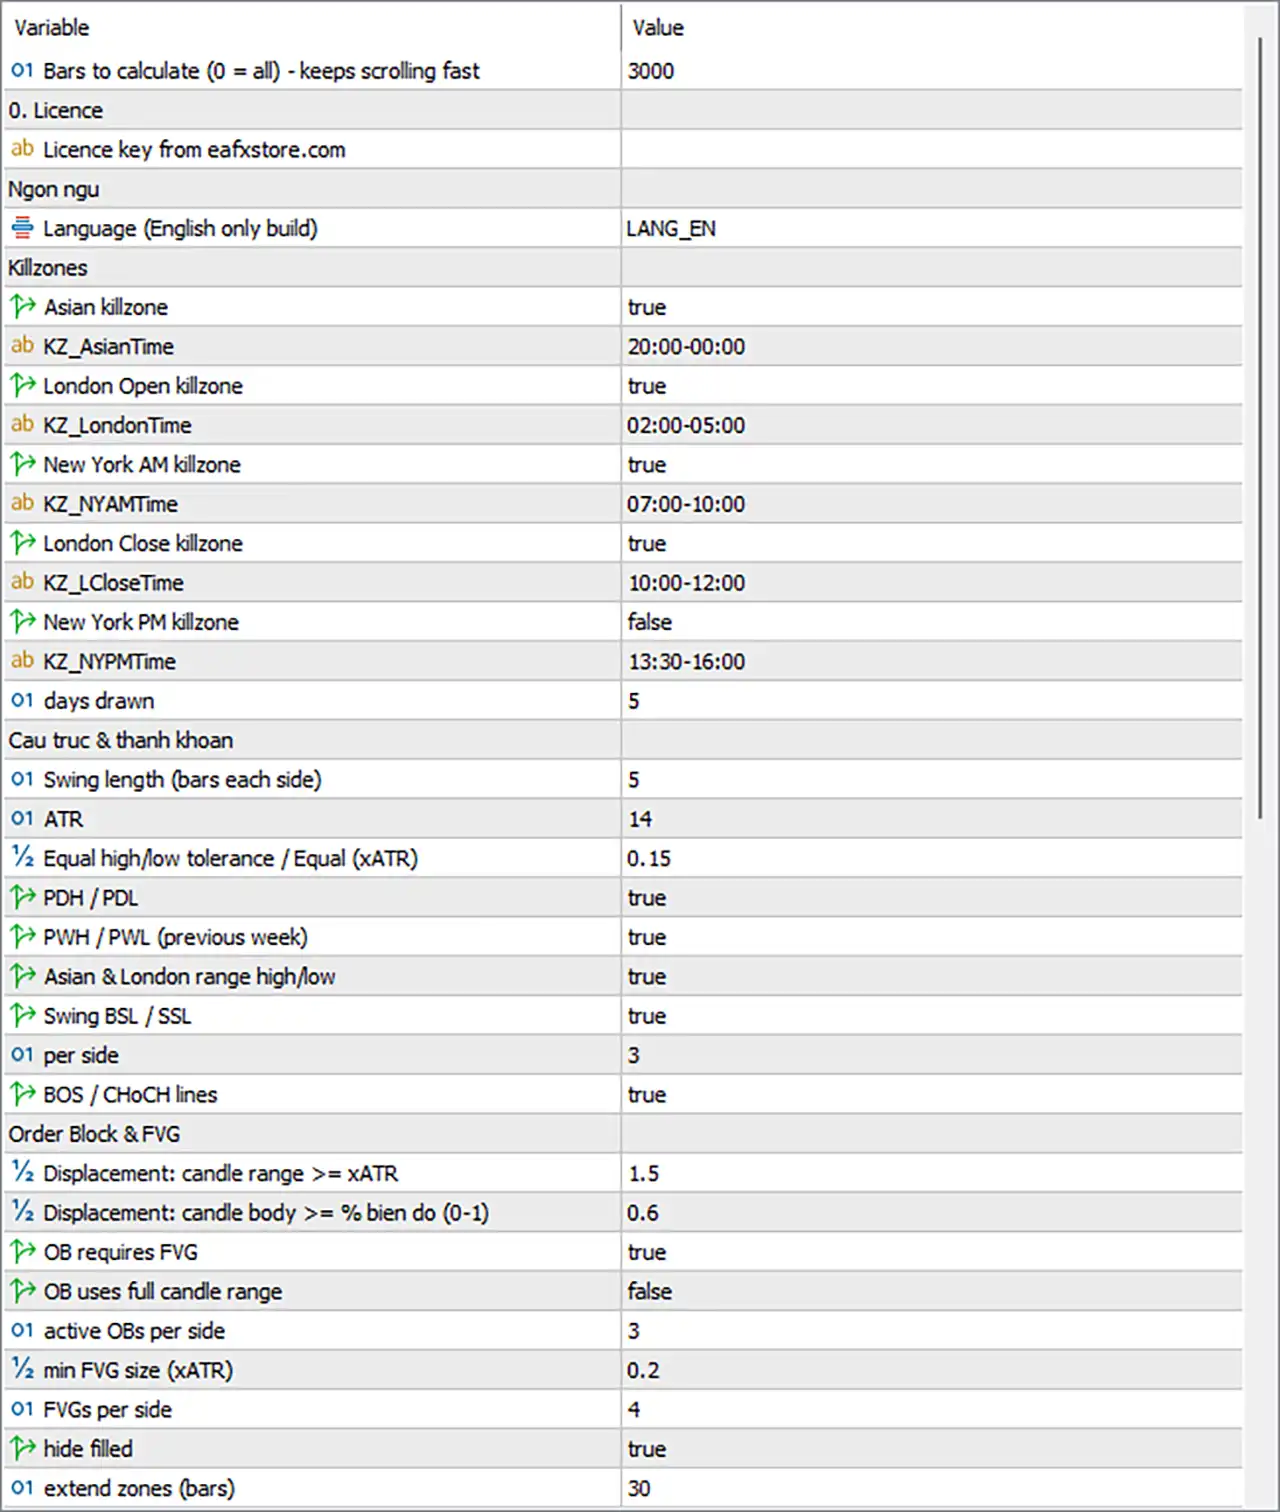
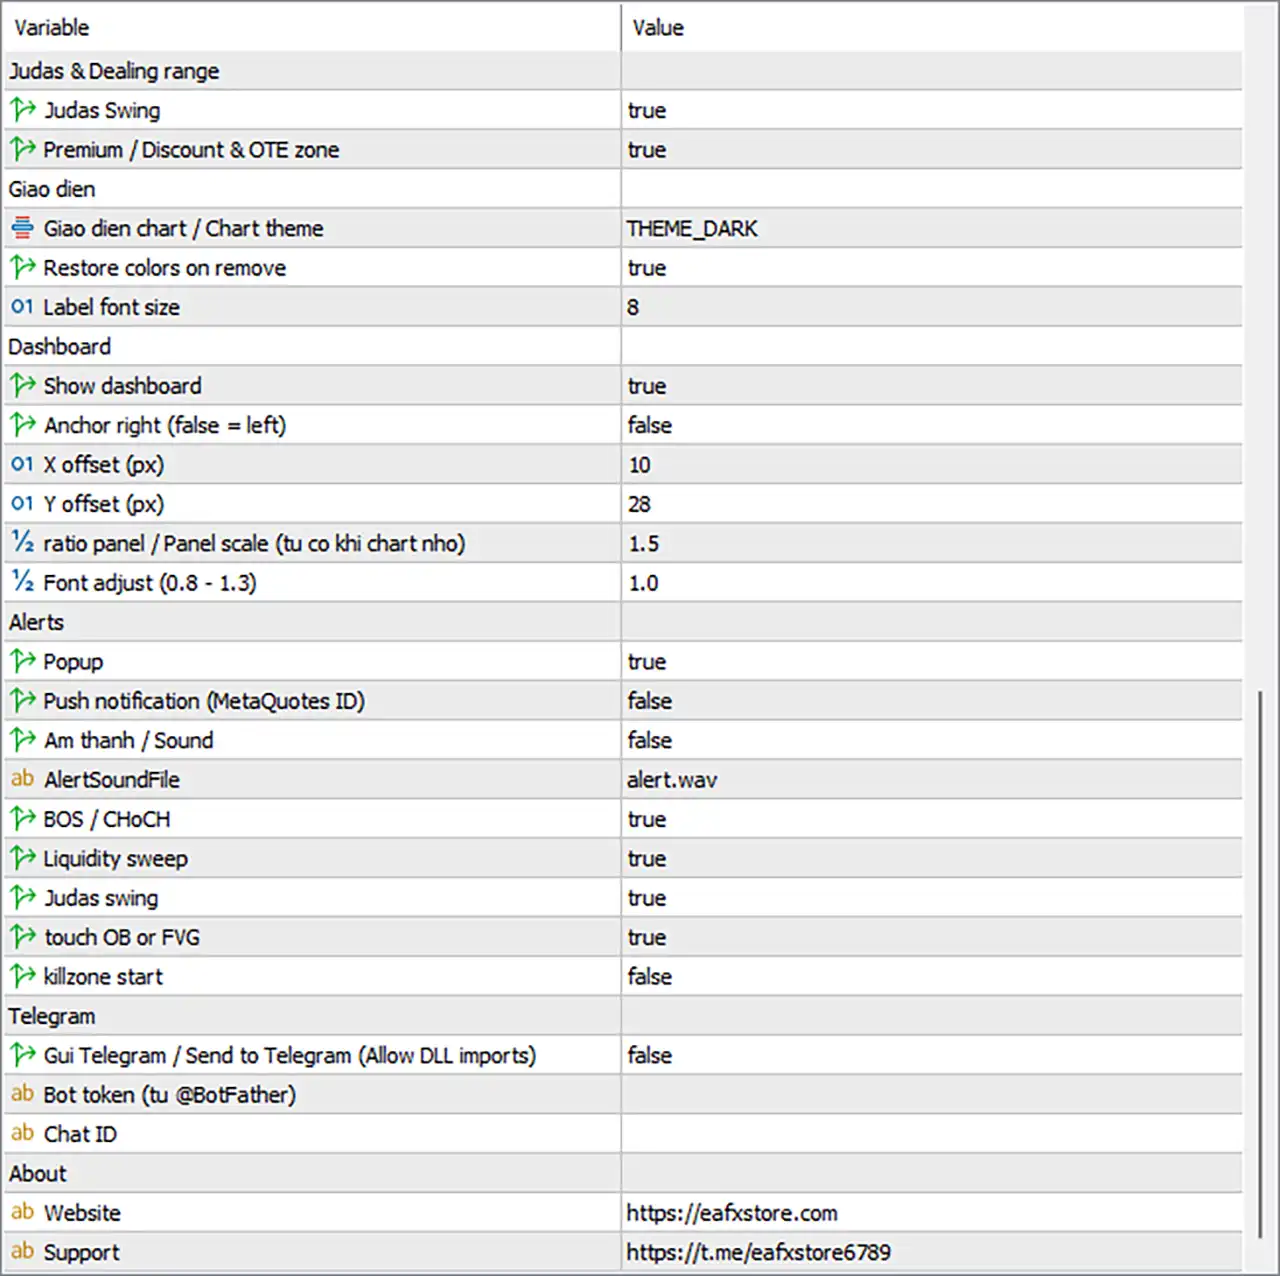
🔢 Omega ICT Killzone - Settings Guide

This guide explains each setting in the "Inputs" tab in detail, using easy-to-understand language. Users do not need to read the entire text; most traders only adjust a few settings, as the default values ​​are already effective.

Omega ICT Killzone Indicator MT5 Settings Panel
Omega ICT Killzone Indicator Settings Panel

Omega ICT Killzone Indicator Settings Panel

🔶 Quick start: the only things you must do

🔹 Copy the indicator file into MT5: File > Open Data Folder > MQL5 > Indicators. Then restart MT5.

🔹 Turn on DLL: Tools > Options > Expert Advisors > tick "Allow DLL imports".

🔹 Drag Omega ICT Killzone onto a chart.

🔹 In the Common tab, tick "Allow DLL imports" again.

🔹 In the Inputs tab, paste your licence key into InpLicenseKey. Click OK.

That is all. Everything else is optional.

🔶 Simple words you will see

🔹 Killzone: a time of day when big moves usually happen (for example the London open).

🔹 Liquidity: price levels where many stop-loss orders are waiting, usually just above old highs or just below old lows.

🔹 Sweep: price quickly pokes through one of those levels, then comes back. It often means a reversal.

🔹 BOS (Break of Structure): price breaks a high or low in the same direction as the trend. The trend continues.

🔹 CHoCH (Change of Character): price breaks a high or low against the trend. The trend may be turning.

🔹 Order Block (OB): the last candle before a strong move. Price often comes back to it.

🔹 FVG (Fair Value Gap): a gap left by a fast move. Price often comes back to fill it.

🔹 Judas Swing: a fake move at the start of a session that tricks traders, then reverses.

🔹 Premium and Discount: the top half of the recent range is expensive (premium), the bottom half is cheap (discount).

🔹 OTE (Optimal Trade Entry): the 62% to 79% pullback area, a popular entry zone.

🔹 ATR: the average size of recent candles. The indicator uses it to judge what is "big" or "small" on any market.

🔢 General

Bars to calculate

🔹 In MT5: MaxBarsCalc

🔹 What it does: How many past candles the indicator looks at when it loads. Only these candles will show zones, levels and events. 0 means all history.

🔹 Default: 3000

🔹 Should I change it? Usually no. If your chart feels slow, lower it to 1500 or 2000. Do not go below 500, or there will not be enough history to find levels.

🔢 Licence

Licence key

🔹 In MT5: InpLicenseKey

🔹 What it does: Your personal key from eafxstore.com. The indicator will not start without it.

🔹 Default: empty

🔹 Should I change it? Yes, you must paste your key here once. Spaces and upper/lower case do not matter.

Good to know:

🔹 Your key is linked to your trading account. If you switch account, the indicator checks the key again by itself.

🔹 If your internet goes down, the indicator keeps working for up to 72 hours.

🔹 Keep your computer clock correct. Moving the clock backwards will stop the indicator.

🔹 If something is wrong, a message appears in the top-left corner of the chart.

🔢 Killzones

Important: all times here are New York time. Not your local time, and not your broker's time. The indicator converts them for you automatically, including summer and winter time changes.

Each killzone has two settings: one to turn it on or off, and one for its time. Write the time like this: 02:00-05:00 (24-hour clock, start-end).

🔶 Asian killzone

🔹 In MT5: KZ_Asian (on/off) and KZ_AsianTime (time)

🔹 What it does: Draws a box around the Asian session and remembers its high and low.

🔹 Default: On, 20:00-00:00

🔹 Should I change it? Keep it on. The Asian high and low are used as liquidity levels, and the London Judas Swing needs them.

🔶 London Open killzone

🔹 In MT5: KZ_London (on/off) and KZ_LondonTime (time)

🔹 What it does: Draws a box around the London open, the time when the high or low of the day often forms.

🔹 Default: On, 02:00-05:00

🔹 Should I change it? Keep it on. The New York Judas Swing needs the London range.

🔶 New York AM killzone

🔹 In MT5: KZ_NYAM (on/off) and KZ_NYAMTime (time)

🔹 What it does: Draws a box around the main New York morning session.

🔹 Default: On, 07:00-10:00

🔹 Should I change it? Keep it on.

🔶 London Close killzone

🔹 In MT5: KZ_LClose (on/off) and KZ_LCloseTime (time)

🔹 What it does: Draws a box around the London close, when traders often take profit.

🔹 Default: On, 10:00-12:00

🔹 Should I change it? Optional. Turn it off if you do not trade this time.

🔶 New York PM killzone

🔹 In MT5: KZ_NYPM (on/off) and KZ_NYPMTime (time)

🔹 What it does: Draws a box around the New York afternoon session.

🔹 Default: Off, 13:30-16:00

🔹 Should I change it? Turn it on only if you trade the afternoon.

🔶 Days to show

🔹 In MT5: KZDays

🔹 What it does: How many recent days of killzone boxes stay on the chart. Older boxes are deleted.

🔹 Default: 5

🔹 Should I change it? Usually no. Lower it for a cleaner chart.

How to check the time is right: look at the bottom of the dashboard. It shows "NY" and the current New York time. If it matches the real New York time, everything is correct.

🔢 Structure & Liquidity (Cau truc & thanh khoan)

🔶 Swing length

🔹 In MT5: PivLen

🔹 What it does: How strict the indicator is when it finds swing highs and lows. A candle must be higher (or lower) than 5 candles on each side to count.

🔹 Default: 5

🔹 Should I change it? Bigger number = fewer, more important swings. Smaller number = more, smaller swings. Try 3 to 4 for scalping, 6 to 8 for swing trading.

🔶 ATR period

🔹 In MT5: AtrLen

🔹 What it does: How many candles are used to measure the average candle size (ATR).

🔹 Default: 14

🔹 Should I change it? No. 14 is the standard value.

🔶 Equal highs / lows tolerance

🔹 In MT5: EqTolATR

🔹 What it does: How close two highs (or two lows) must be to count as "equal". Equal highs and lows are strong liquidity targets.

🔹 Default: 0.15

🔹 Should I change it? Usually no. Raise it to find more equal levels, lower it to find fewer.

🔶 Previous day high / low

🔹 In MT5: ShowPDHL

🔹 What it does: Shows yesterday's high and low (PDH and PDL).

🔹 Default: On

🔹 Should I change it? Keep it on. These are some of the most important levels.

🔶 Previous week high / low

🔹 In MT5: ShowPWHL

🔹 What it does: Shows last week's high and low (PWH and PWL).

🔹 Default: On

🔹 Should I change it? Keep it on. You can turn it off if you only scalp.

🔶 Session high / low

🔹 In MT5: ShowSessionHL

🔹 What it does: When the Asian and London sessions end, draws their high and low.

🔹 Default: On

🔹 Should I change it? Keep it on.

🔶 Swing liquidity

🔹 In MT5: ShowSwingLiq

🔹 What it does: Shows recent swing highs (BSL, buy-side liquidity) and swing lows (SSL, sell-side liquidity).

🔹 Default: On

🔹 Should I change it? Keep it on.

🔶 Swing liquidity per side

🔹 In MT5: MaxSwingLiq

🔹 What it does: How many swing high and swing low levels are shown on each side.

🔹 Default: 3

🔹 Should I change it? Lower it if the chart looks busy.

🔶 Structure lines

🔹 In MT5: ShowStructure

🔹 What it does: Draws the BOS and CHoCH lines and labels on the chart.

🔹 Default: On

🔹 Should I change it? Optional. If you turn it off, only the lines disappear. The dashboard and alerts still work.

What a sweep looks like on the chart: the level line becomes dotted, an "x" is added to its label, and a small arrow appears on the candle that swept it.

🔢 Order Block & FVG

🔶 Strong candle size

🔹 In MT5: DispATR

🔹 What it does: How big a candle must be to count as a strong move. 1.5 means 1.5 times the average candle size. Order Blocks are only created after a strong move.

🔹 Default: 1.5

🔹 Should I change it? Raise it (1.8 to 2.0) for fewer, stronger Order Blocks. Lower it (1.2 to 1.3) for more.

🔶 Strong candle body

🔹 In MT5: DispBody

🔹 What it does: How big the candle body must be compared with the whole candle. 0.6 means the body is at least 60%. This ignores candles with long wicks.

🔹 Default: 0.6

🔹 Should I change it? Usually no.

🔶 Order Block needs an FVG

🔹 In MT5: OBRequireFVG

🔹 What it does: Only creates an Order Block if the strong move also leaves a Fair Value Gap.

🔹 Default: On

🔹 Should I change it? Keep it on for better quality. Turn it off if you want to see more Order Blocks.

🔶 Order Block size

🔹 In MT5: OBUseWick

🔹 What it does: Off: the Order Block is drawn from the candle body only. On: it uses the whole candle, including wicks, so the zone is bigger.

🔹 Default: Off

🔹 Should I change it? Your choice. Most traders keep it off.

🔶 Order Blocks per side

🔹 In MT5: MaxOB

🔹 What it does: How many active Order Blocks are shown for buys and for sells.

🔹 Default: 3

🔹 Should I change it? Lower it for a cleaner chart.

🔶 Minimum FVG size

🔹 In MT5: FVGMinATR

🔹 What it does: Gaps smaller than this are ignored. 0.2 means 20% of the average candle size.

🔹 Default: 0.2

🔹 Should I change it? Raise it to 0.3 on gold or indices if you see too many tiny gaps.

🔶 FVGs per side

🔹 In MT5: MaxFVG

🔹 What it does: How many active FVGs are shown for buys and for sells.

🔹 Default: 4

🔹 Should I change it? Lower it for a cleaner chart.

🔶 Hide used zones

🔹 In MT5: HideFilled

🔹 What it does: On: an Order Block or FVG disappears after price touches it. Off: it stays on the chart in a darker colour with an "x".

🔹 Default: On

🔹 Should I change it? Keep it on for a clean chart.

🔶 Zone length

🔹 In MT5: ExtendBars

🔹 What it does: How far to the right (in candles) zones and the EQ / OTE lines are drawn.

🔹 Default: 30

🔹 Should I change it? Your choice. Use a bigger number on higher timeframes.

What happens to a zone: it is drawn when it appears. When price comes back into it, it is "touched" (and you can get an alert). If a candle closes fully through it, the zone is removed.

🔢 Judas & Dealing range

🔶 Judas Swing

🔹 In MT5: ShowJudas

🔹 What it does: Shows a JUDAS label when price fakes a breakout of the Asian range during London, or of the London range during New York, and then closes back inside. Red = expect price to go down. Green = expect price to go up.

🔹 Default: On

🔹 Should I change it? Keep it on.

🔶 Premium / Discount and OTE

🔹 In MT5: ShowPD

🔹 What it does: Draws the 50% line (EQ) and the OTE zone (62% to 79%) of the recent range.

🔹 Default: On

🔹 Should I change it? Keep it on. If you turn it off, the dashboard still shows premium and discount.

🔢 Appearance (Giao dien)

🔶 Chart theme

🔹 In MT5: Theme

🔹 What it does: Changes the chart colours. THEME_DARK = dark grey. THEME_MIDNIGHT = dark blue. THEME_LIGHT = white. THEME_NONE = keep your own colours.

🔹 Default: THEME_DARK

🔹 Should I change it? Your choice. Dark themes make the zones easiest to see.

🔶 Restore my colours

🔹 In MT5: RestoreTheme

🔹 What it does: When you remove the indicator, your old chart colours come back.

🔹 Default: On

🔹 Should I change it? Keep it on.

🔶 Label size

🔹 In MT5: LabelFont

🔹 What it does: The text size of the labels on the chart.

🔹 Default: 8

🔹 Should I change it? Raise it if labels are hard to read on a big screen.

🔢 Dashboard

🔶 Show dashboard

🔹 In MT5: ShowDash

🔹 What it does: Shows or hides the information panel.

🔹 Default: On

🔹 Should I change it? Keep it on. It gives you the full picture at a glance.

🔶 Left or right side

🔹 In MT5: DashRight

🔹 What it does: Off = panel on the left. On = panel on the right.

🔹 Default: Off

🔹 Should I change it? Your choice.

🔶 Panel position

🔹 In MT5: DashX and DashY

🔹 What it does: Distance of the panel from the side and from the top of the chart, in pixels.

🔹 Default: 10 and 28

🔹 Should I change it? Easier way: just drag the panel by its top bar with your mouse. MT5 remembers where you put it.

🔶 Panel size

🔹 In MT5: DashScale

🔹 What it does: How big the panel is. It shrinks by itself if the chart is too small.

🔹 Default: 1.5

🔹 Should I change it? Lower it (for example 1.0 or 1.2) on a small screen.

🔶 Panel text size

🔹 In MT5: DashFontAdj

🔹 What it does: Makes the text inside the panel a little bigger or smaller. Use a value from 0.8 to 1.3.

🔹 Default: 1.0

🔹 Should I change it? Only if the text looks too crowded or too small.

Buttons at the bottom of the panel: WEB opens the website, TELEGRAM opens support, TEST TG sends a test message to your Telegram (only visible when Telegram is on).

To reset the panel position: press F3 in MT5 and delete the two items that start with OMICT_DASHX_ and OMICT_DASHY_.

🔢 Alerts

This group has two parts. First, choose HOW you want to be told. Then choose WHAT you want to be told about. Alerts only fire for new candles, never for old history.

🔶 How you are told

Popup

🔹 In MT5: AlertPopup

🔹 What it does: Shows the normal MT5 alert window with a sound.

🔹 Default: On

🔹 Should I change it? Keep it on if you watch the screen.

Phone notification

🔹 In MT5: AlertPush

🔹 What it does: Sends a message to the MetaTrader 5 app on your phone.

🔹 Default: Off

🔹 Should I change it? Turn it on if you want alerts on your phone. First add your MetaQuotes ID in Tools > Options > Notifications.

Sound

🔹 In MT5: AlertSoundOn and AlertSoundFile

🔹 What it does: Plays a sound file. The file must be in the MT5 Sounds folder.

🔹 Default: Off, alert.wav

🔹 Should I change it? Optional.

🔶 What you are told about

Structure breaks

🔹 In MT5: AlertStructure

🔹 What it does: Alerts on every BOS and CHoCH.

🔹 Default: On

🔹 Should I change it? Keep it on.

Liquidity sweeps

🔹 In MT5: AlertSweep

🔹 What it does: Alerts when a liquidity level is swept.

🔹 Default: On

🔹 Should I change it? Keep it on. This is one of the most useful alerts.

Judas Swing

🔹 In MT5: AlertJudas

🔹 What it does: Alerts when a Judas Swing appears.

🔹 Default: On

🔹 Should I change it? Keep it on.

Zone touches

🔹 In MT5: AlertZones

🔹 What it does: Alerts when price touches an Order Block or FVG.

🔹 Default: On

🔹 Should I change it? Turn it off on M1 or M5 if you get too many alerts.

Killzone start

🔹 In MT5: AlertKillzone

🔹 What it does: Alerts when each killzone begins.

🔹 Default: Off

🔹 Should I change it? Turn it on if you want a reminder that the session is starting.

🔢 Telegram

🔶 Send to Telegram

🔹 In MT5: TgEnable

🔹 What it does: Sends all your chosen alerts to Telegram as well.

🔹 Default: Off

🔹 Should I change it? Turn it on if you want alerts in Telegram. You also need the two settings below.

🔶 Bot token

🔹 In MT5: TgToken

🔹 What it does: The secret code of your Telegram bot.

🔹 Default: empty

🔹 Should I change it? Required for Telegram. Keep it private.

🔶 Chat ID

🔹 In MT5: TgChatID

🔹 What it does: The number of the chat or group that will receive the messages. Group numbers start with a minus sign.

🔹 Default: empty

🔹 Should I change it? Required for Telegram.

🔢 How to set up Telegram in 5 steps

🔹 In Telegram, search for @BotFather, send /newbot and follow the steps. Copy the token into TgToken.

🔹 Open a chat with your new bot and press Start. For a group, add the bot to the group.

🔹 Send any message to your bot. Then open this address in your browser (put your token in it): https://api.telegram.org/bot<YOUR_TOKEN>/getUpdates. Find "chat":{"id": and copy the number after it.

🔹 Paste that number into TgChatID and set TgEnable to true.

🔹 Click the TEST TG button on the dashboard. You should get a message in Telegram.

🔢 About

Website and support links

🔹 In MT5: AboutWeb and AboutTelegram

🔹 What it does: The links opened by the WEB and TELEGRAM buttons on the dashboard.

🔹 Default: https://eafxstore.com and https://t.me/eafxstore6789

🔹 Should I change it? No.

🔢 Recommended settings in one minute

If you scalp on M1 to M5:

🔹 PivLen 3 or 4

🔹 DispATR 1.8

🔹 FVGMinATR 0.3

🔹 MaxOB 2, MaxFVG 3

🔹 AlertZones off

If you day trade on M5 to M15:

🔹 Keep all default settings.

If you swing trade on H1 to H4:

🔹 PivLen 6 to 8

🔹 DispATR 1.3

🔹 ExtendBars 50

🔹 Killzone boxes are less useful here. Use them for reference only.

Common problems and quick fixes

🔹 Nothing on the chart and a "Licence" message at the top left: check your key, tick Allow DLL imports, and check your internet.

🔹 Killzone boxes at the wrong time: make sure you typed New York times. Check the NY time at the bottom of the dashboard.

🔹 Too many zones and lines: lower MaxOB, MaxFVG and MaxSwingLiq, and keep HideFilled on.

🔹 Not enough Order Blocks: lower DispATR to 1.2 or turn off OBRequireFVG.

🔹 Dashboard too big: lower DashScale or drag it somewhere else.

🔹 Telegram test fails: check the token and chat ID, press Start in the bot chat, and tick Allow DLL imports.

🔹 Chart is slow: lower MaxBarsCalc to 1500 and KZDays to 3.
Full review

Quick Verdict

Omega ICT Killzone Indicator MT5 brings ICT sessions liquidity structure and price arrays into one automated chart tool. It detects killzones sweeps BOS CHoCH order blocks FVGs and Judas Swings while providing an ICT Score dashboard and real time alerts for more structured market analysis.

Best For

✅ ICT traders who want automated killzone and liquidity analysis.

✅ Forex gold indices and CFD traders using intraday strategies.

✅ Traders combining higher timeframe bias with M5 or M15 entries.

✅ Traders who use liquidity sweeps BOS CHoCH OB and FVG concepts.

✅ Beginners learning ICT concepts through clearly labeled chart structures.

Overall Rating

⭐⭐⭐⭐⭐ 9.0/10


What is Omega ICT Killzone Indicator MT5?

Omega ICT Killzone is a MetaTrader 5 indicator built around the core concepts of the Inner Circle Trader methodology. It automatically identifies trading sessions, liquidity pools, market structure, order blocks, Fair Value Gaps, Judas Swings, Premium and Discount zones and OTE areas. A live dashboard combines these elements into a broader view of the current market context.

The indicator is intended for discretionary traders working with forex, gold, indices and other CFDs. Rather than manually drawing every ICT element, the software continuously updates the chart as new closed candles are processed.

⭐ Join Our Channel Telegram


How Does Omega ICT Killzone Indicator MT5 Work?

Automatic New York Time Engine

ICT sessions are calculated using New York time.

The indicator compares broker server time with GMT and automatically accounts for US daylight saving time, helping keep the killzone windows aligned with the intended session schedule.

Closed Bar Market Analysis

Omega ICT Killzone processes historical candles when the indicator loads and then evaluates each new candle after it closes.

ATR, liquidity levels, killzones, sweeps, swings, market structure, displacement, FVGs and order blocks are processed in sequence.

Using closed candles means signals do not continuously appear and disappear while the current candle is still forming.

ICT Killzone Detection

The indicator provides five configurable New York session windows including Asian, London Open, New York AM, London Close and New York PM.

Asian and London ranges can later become important liquidity reference points.

Liquidity Sweep Detection

The system monitors previous day and week highs and lows, Asian and London highs and lows, equal highs and lows, plus recent swing liquidity.

When price trades through a level and closes back on the opposite side, the event is recorded as a liquidity sweep.

BOS and CHoCH Analysis

Market structure is determined from candle closes beyond confirmed swing points.

A continuation produces a BOS while a change against the previous trend can produce a CHoCH. This structure information also contributes to the dashboard trend and ICT Score.

Order Blocks and Fair Value Gaps

Strong displacement candles are evaluated for Order Blocks and Fair Value Gaps.

The default displacement requirement uses an ATR-based candle range and body condition, while FVGs below the minimum ATR threshold are ignored.

Active zones remain on the chart until they are touched or invalidated.

Premium Discount and OTE

The dealing range is calculated from the latest confirmed swing high and swing low.

The indicator displays equilibrium at 50 percent and the OTE zone between 62 and 79 percent, helping distinguish potential discount areas in bullish conditions from premium areas in bearish conditions.


Key Features of Omega ICT Killzone Indicator MT5

Automatic ICT Killzones

Five configurable session windows help traders monitor the Asian, London and New York trading periods directly on the MT5 chart.

Liquidity Pool Mapping

PDH, PDL, PWH, PWL, Asian H/L, London H/L, EQH, EQL and recent BSL or SSL levels are automatically identified and displayed as liquidity references.

BOS and CHoCH Detection

The indicator automatically tracks market structure using confirmed swing points and candle closes, identifying both continuation and potential structure shifts.

Order Block Detection

Bullish and bearish Order Blocks are identified around qualifying displacement candles. The indicator also monitors whether active zones are touched or invalidated.

Fair Value Gap Analysis

FVG detection identifies three-candle price gaps while filtering out gaps below the configured ATR threshold. The most recent active zones remain visible for market analysis.

Judas Swing Detection

The indicator looks for false breaks of the Asian range during London and false breaks of the London range during New York AM. These events are labeled directly on the chart.

ICT Score Dashboard

The dashboard combines market structure, Premium and Discount position, liquidity sweeps, Judas Swings, Order Blocks and active killzones into an ICT Score from 0 to 100.

Scores of 60 or above are classified as bullish, while 40 or below are bearish.

Multi Channel Alerts

Alerts can be delivered through popup messages, mobile push notifications, sound and Telegram.

Supported events include structure breaks, liquidity sweeps, Judas Swings, OB and FVG touches and killzone starts.


Omega ICT Killzone Indicator MT5 Review

Omega ICT Killzone Indicator MT5 combines several important ICT concepts into a single MT5 workspace. The main advantage is the reduction of repetitive chart preparation. Sessions, liquidity levels, structure and price arrays are automatically updated instead of requiring manual drawing every trading day.

The indicator also adds a useful layer of market context through its ICT Score. Rather than displaying isolated signals, the dashboard considers several confluence factors including trend structure, Premium or Discount positioning, recent liquidity sweeps, Judas Swing events, nearby Order Blocks and active killzones.

Another practical feature is the closed-candle processing model. Historical events are not repeatedly alerted when a chart is opened, while live alerts are reserved for current market activity. This makes the indicator more suitable for traders who want ongoing monitoring without a large amount of historical alert noise.

Omega ICT Killzone Indicator Review
Omega ICT Killzone Indicator Reviews

Omega ICT Killzone Indicator Reviews

Simple BUY and SELL Entry Strategy

For beginners, the Omega Harmonic Edge Indicator can be used with a simple harmonic pattern confirmation approach. The main idea is to wait for a harmonic pattern to complete near the Potential Reversal Zone (PRZ), then look for a clear price reaction before entering a trade.

BUY Entry

🔹 Step 1: Wait for the Omega Harmonic Edge Indicator to identify a bullish harmonic pattern and project a Potential Reversal Zone.

🔹 Step 2: Allow price to reach or enter the bullish PRZ instead of entering before the pattern is completed.

🔹 Step 3: Look for a bullish reaction from the PRZ, such as a bullish candle closing away from the reversal zone.

🔹 Step 4: Enter a BUY position after the bullish confirmation candle closes.

🔹 Stop Loss: Place the Stop Loss below the PRZ or below the recent swing low.

🔹 Take Profit: Target the next resistance level or a projected harmonic target, using a predefined risk-to-reward ratio such as 1:2 when appropriate.

SELL Entry

🔹 Step 1: Wait for the Omega Harmonic Edge Indicator to identify a bearish harmonic pattern and project a Potential Reversal Zone.

🔹 Step 2: Allow price to reach or enter the bearish PRZ instead of entering before the pattern is completed.

🔹 Step 3: Look for a bearish reaction from the PRZ, such as a bearish candle closing away from the reversal zone.

🔹 Step 4: Enter a SELL position after the bearish confirmation candle closes.

🔹 Stop Loss: Place the Stop Loss above the PRZ or above the recent swing high.

🔹 Take Profit: Target the next support level or a projected harmonic target, using a predefined risk-to-reward ratio such as 1:2 when appropriate.

Simple Entry Rule for Beginners

The basic rule is:

BUY = Bullish Harmonic Pattern + PRZ + Bullish Confirmation

SELL = Bearish Harmonic Pattern + PRZ + Bearish Confirmation

Avoid entering a trade simply because the harmonic pattern appears on the chart. Wait for the pattern to complete and for price to react from the Potential Reversal Zone. A candle close in the expected direction provides an additional confirmation before entering.

This simple approach makes the Omega Harmonic Edge Indicator easier for beginners to understand and apply. More advanced traders can later incorporate Fibonacci ratios, harmonic pattern quality scores, market structure, and additional confirmation tools into the trading process.

Omega ICT Killzone Indicator MT5 Review

Omega ICT Killzone Indicator MT5 Review

Why Omega ICT Killzone Indicator MT5 Stands Out

Complete ICT Market Framework

Sessions, liquidity, structure and PD arrays are combined in one indicator rather than being separated across multiple chart tools.

Automatic Session Synchronization

The New York time engine detects broker server offsets and applies daylight saving adjustments, helping keep ICT sessions aligned throughout the year.

Strong Liquidity Context

The indicator does more than mark session boxes. It tracks previous day and week levels, session highs and lows, equal highs and lows and recent swing liquidity.

Confluence Based Market Reading

The ICT Score brings multiple market conditions together, including structure, liquidity sweeps, Judas Swing events, PD positioning and nearby Order Blocks.

Practical ICT Visualization

BOS, CHoCH, sweeps, OBs, FVGs, Judas events and OTE zones are labeled directly on the chart, making the market structure easier to review.

Multi Timeframe Flexibility

The recommended workflow supports higher timeframe analysis on H1 or H4 while using M5 or M15 for more precise killzone entries.

Flexible Configuration

Thresholds, session windows, visual elements and alert settings can be adjusted to different instruments and trading approaches.

Telegram and Mobile Notifications

The alert system extends beyond the MT5 chart, allowing important ICT events to reach mobile devices and Telegram.


Risk Management Features

Liquidity Based Risk Location

Liquidity sweeps provide important reference points for defining invalidation areas and understanding where price has recently taken stops.

OTE Zone Analysis

The OTE range between 62 and 79 percent gives traders a structured area to evaluate potential retracements within the dealing range.

Structure Based Confirmation

Waiting for a CHoCH or BOS after a liquidity event can provide additional structure confirmation before considering a setup.

Risk Beyond the Sweep Extreme

The recommended workflow places risk beyond the sweep extreme when planning an entry around an OB or FVG return.

Reduced Chart Noise

The indicator limits active zones and automatically hides filled zones, helping maintain a cleaner trading workspace.


Trading Style Timeframe Key Settings Recommended Setup
Scalping M1-M5 PivLen 3-4, DispATR 1.8-2.0, FVGMinATR 0.3 London and NY AM
Intraday M5-M15 PivLen 5, DispATR 1.5, FVGMinATR 0.2 Asian, London, NY AM and London Close
Swing H1-H4 PivLen 5-8, DispATR 1.3-1.5, FVGMinATR 0.15-0.2 Higher timeframe reference

The recommended execution timeframes are M5 and M15, with H1 providing broader market context. The indicator is especially focused on M1 to M30 for killzone analysis.

For gold and indices, the source recommends considering a higher FVGMinATR such as 0.3 when smaller gaps create excessive chart activity.


Weaknesses and Risk Warnings

ICT Concepts Require Understanding

The indicator automates the identification and visualization of ICT concepts, but understanding liquidity, market structure, Order Blocks, FVGs and killzones remains important for interpreting the information correctly.

Swing Confirmation Creates Delay

Swing points require PivLen bars for confirmation.

This creates a normal delay between the formation of a swing and its confirmation.

Too Many Alerts Can Become Noisy

Zone alerts can produce frequent notifications on active markets.

The recommended approach is to begin with structure, sweep and Judas alerts before adding more zone notifications.

Settings Depend on the Instrument

Forex, gold and indices can behave differently.

ATR-based thresholds may need adjustment when market volatility changes or when moving between instruments.

Historical Analysis Is Not a Guarantee

Past market structure, liquidity reactions and ICT events do not guarantee future outcomes.

The indicator is an analytical tool rather than a guarantee of profitable trades.

Licensing and Internet Requirements

The indicator performs licence verification through the eafxstore.com licence server and requires internet access for licence checks.

Allow DLL imports is also required for licensing, Telegram and the WEB or TELEGRAM buttons.

Trading Risk

Omega ICT Killzone does not replace trading judgment or risk management.

Proper position sizing, stop placement and account risk controls remain essential when applying any ICT based trading strategy.


Product Download Package?

The download package of the product suite includes:

✅ Indicator: OmegaICTKillzone_v1.0.ex5

✅ Omega_ICT_Killzone_Overview_Guide.pdf

✅ Omega_ICT_Killzone_Inputs_Settings_Guide.pdf

➡️ Reviewed by David Easton


Final Verdict

Omega ICT Killzone Indicator brings the major building blocks of ICT analysis into one organized MT5 environment. Automatic New York killzones, liquidity sweeps, BOS and CHoCH, Order Blocks, FVGs, Judas Swings, Premium and Discount zones, OTE and the ICT Score create a broad market analysis framework. Multi channel alerts and configurable settings make it practical for intraday workflows, while its closed candle processing helps maintain consistent signals.

Questions about Omega ICT Killzone Indicator MT5

❓ What does Omega ICT Killzone Indicator MT5 do?

Omega ICT Killzone Indicator MT5 automatically detects ICT sessions, liquidity levels, market structure, order blocks, Fair Value Gaps, Judas Swings, and OTE zones on the chart.

❓ Which markets can Omega ICT Killzone Indicator MT5 analyze?

Omega ICT Killzone Indicator MT5 is designed for Forex pairs, gold, indices, and other CFDs, providing ICT-based market analysis across different supported instruments and timeframes.

❓ How does Omega ICT Killzone Indicator MT5 handle Killzone timing?

Omega ICT Killzone Indicator MT5 uses New York time and automatically detects the broker server offset while accounting for US daylight saving time to keep sessions aligned.

❓ What Killzones are included in Omega ICT Killzone Indicator MT5?

Omega ICT Killzone Indicator MT5 includes Asian, London Open, New York AM, London Close, and New York PM sessions, with configurable time windows.

❓ How does Omega ICT Killzone Indicator MT5 detect liquidity sweeps?

Omega ICT Killzone Indicator MT5 tracks PDH, PDL, PWH, PWL, session highs and lows, EQH/EQL, and recent swing liquidity, then identifies candles that sweep and close back through these levels.

❓ Does Omega ICT Killzone Indicator MT5 identify BOS and CHoCH?

Yes. Omega ICT Killzone Indicator MT5 detects structure breaks from candle closes, identifying BOS for continuation and CHoCH for potential changes in market structure.

❓ Can Omega ICT Killzone Indicator MT5 detect Order Blocks and FVGs?

Yes. Omega ICT Killzone Indicator MT5 identifies displacement-based Order Blocks and Fair Value Gaps, tracks their mitigation, and removes zones when they become invalidated.

❓ What is the ICT Score in Omega ICT Killzone Indicator MT5?

The ICT Score in Omega ICT Killzone Indicator MT5 is a 0–100 confluence score based on structure, premium or discount, liquidity sweeps, Judas Swings, Order Blocks, and active Killzones.

❓ Does Omega ICT Killzone Indicator MT5 provide alerts?

Yes. Omega ICT Killzone Indicator MT5 can send popup, mobile push, sound, and Telegram alerts for structure breaks, liquidity sweeps, Judas Swings, zone touches, and Killzone starts.

❓ What timeframes are recommended for Omega ICT Killzone Indicator MT5?

Omega ICT Killzone Indicator MT5 is recommended mainly for M5 and M15 execution, with H1 for market context. Killzones are particularly useful from M1 to M30.

Other products traders compare

From $25
Instant download
Choose option